Showing posts with label sketch card. Show all posts

Weapon H by the amazing NAR!


Check out “Weapon H” by the amazing NAR!
Pencil sketch , ink drawing, then colored with markers. 
After you see the details after details after details visit here to see more of his work!
Thank you for letting us share your artwork. 

The pencil sketch...


The ink drawing...


And the finished artwork...
WEAPON H


Wolverine Days of Future Past by Frank A. Kadar


Please click the images below to enlarge and see Frank A. Kadar's step by step of his "Wolverine Days of Future Past" Artist Proof (sketch card) from Rittenhouse's Marvel Bronze Age set.
Check out Frank's Deviant Art Gallery to see more of his work. Thank you for your submission and giving howtosketchdrawpaint.blogspot.com permission to share your art!


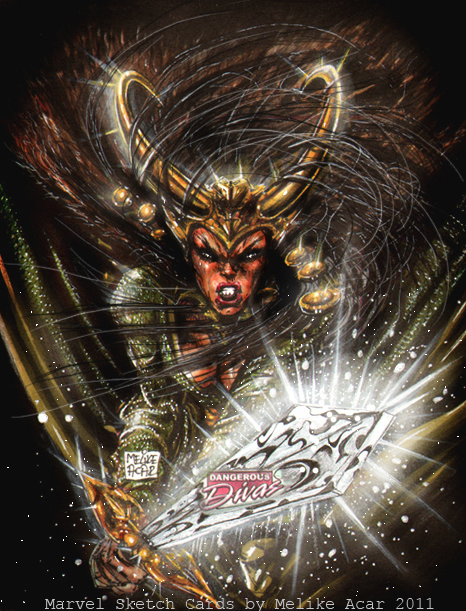
Loki (sketch card from Dangerous Divas) By Melike Acar

This is one of Melike Acar's sketch cards from the Rittenhouse Archives' Marvel Dangerous Divas trading card set.


The following images shows the step-by-step using pencil, ink, and markers. 


Thank you Melike Acar for, again, letting us share your amazing talent! Please visit her facebook page. :)

Red Skull ATC (Artist Trading Card) By MARLO

MARLO shows us how to make an ATC (Artist Trading Card) with a cut-out. MARLO used a recycled cardboard, pencil, white gel pen, copic markers, ruler, and an x-acto knife. See more of MARLO's work here.


Sketch Cards From Pencil To Color By Nestor Celario

Nestor "JesterretseJ" Celario is a freelance illustrator from the Philippines.
Here you see the progression of two Artist Proofs from the Marvel 2012 Greatest Heroes Trading Cards set from pencils to inks to fully colored. You can find more of Nestor's work on his facebook page.


Arya Stark (Game of Thrones) Sketch Card By David Desbois

Instructions are excerpts from David Desbois' tutorial. Thank you very much for giving us permission to share your work and learn from your step-by-step instructions! :)

1 - I start with pale marker Warm Grey 0.5, 1,2 and 3 (WG) to do a general structure that do not need to be exactly perfect or complete, can be just a part that you wanna work with for now. The pale crayon lines are watercolor pencil that can more or less fade in with marker(or water).

2 - I'm starting with stronger color, hence a Lavender from TOUCH and Lavender for ProMarker and a Pale Lavender from TOUCH. Stronger colors can be modified/faded with pale ones, so you need to start strong. 

3 - I started using Cool Grey 7 and 6 that are quite dark, when shading a visage, I recommend not going over 6 or 7 because if you miss, colors too dark won't 'decolorate' or fade much with a colorless blender. By keeping colors low, you can pretty much move them around and rework them with other layers to alter their value.
I then attempt to shade it all that with Warm Grey using mostly 4, 5,6 and 7, the Pale Lavender(TOUCH) and Lavender(ProMarker). 
So you play with layers until you are pretty much satisfied of what you get, it can takes a few layers or a crazy number, you just need to wait a bit between consecutive layers if you don't wanna screw your paper (and make sure your paper do well with blending). For eyes, used a Pale Blue Light (TOUCH) and lavender tones and the Mauve Shadow from TOUCH, Putty from ProMarker.


4 - I continued detailing the main features and perfect the blending with warm greys, lavender tones and also used a layer of putty in pale areas for details I used watercolor pencils, multiliners and verithin prismacolor.

For the iris, I used a Marine (ProMarker) and diminished it's intensity with Blue Grey 3 or 5 and put some 7 in the upper part. I also used the colorless to enlight some parts before that. White light dots are Copic White (with paint and brush).

5 - Background consist on the right part of a gradation from black to Cool Grey 8, using the 9 in between, left part I went up to Cool Grey 5, then used a Warm Grey 5 in the bottom part. Finally I used the Pale Blue Light from middle to top part of the left section of the background. I also used the same warm grey light tones to create some texture and dilute here and there. 

6 - Indeed that piece will need a lot more details, you can see I started the hair using a mix of Cool Grey 7 and Warm Grey 7 and also black multiliner 0.03 and 0.05 to direct my lines. You do need a lot precision and observation in that chapter. For highlights, I used Copic White and brush. For the blue in the hair, I used Premier Bleu Ciel Pale and Bleu Inactinique and also Creme much used in other areas. Now to get to the final piece, I'll rework the visage creating 'bridges' between too visible marker lines with either verithin, or watercolor pencil dry or Stabilo All-Brown color here, that will help create a better harmony in the shading. For micro details, I used multiliners. So the shading is pretty much done in pic 6.

Here's the final version. Total around 20 hours to finish.
 

Video Of Charles Hall Painting a Loch Ness Monster Sketch Card

Let's watch a snippet of a video where Charles Hall is painting the Loch Ness Monster using oil paints (over a pencil sketch) on card stock. The artwork is a PSC (personal sketch card) so the size is only 2.5" x 3.5" :) Thanks Charles for letting us share your work!


World War Hulk - Video Of George Calloway Drawing a Sketch Card

This is a video of George Calloway drawing and coloring a sketch card of World War Hulk for the official trading card set "Marvel 70th Anniversary" from Rittenhouse Archives. Thank you for letting us share your video so everyone can see you in action!


Video - Black Cat Sketch Cards By Nicole Goff

Here's a fun video put together by Ms. Nicole Goff.  Nicole was working on some of her official Spider-man sketch cards. From watching the video it looks like she used 5 sketch cards of the Black Cat in different poses. This allowed Nicole to edit in a way that the Black Cat is dancing to the Caramelldansen song. Not sure if I'm explaining this correctly so why don't we just click on the image and enjoy the show! :)  *special appearance by Mandy

If you'd like to see more of Nicole Goff's video just click here and/or stay tuned for we will be posting more of her work in the future. Thanks again Nicole for giving us the permission to share your work.


Death Sketch Card By Tim Shay

Tim Shay uses Copic Markers and Prismacolor Colored Pencils with his artwork. 

"Just thought I'd share the progression of the various stages of my Death sketch… sorry for the fuzzy images, camera phone :/ " ~Tim Shay


Captain America Sketch Card By Melike Acar

This is a step-by-step of a Captain America sketch card by Melike Acar. She started with a pencil drawing, then Copic Multiliner Pens with various nib sizes, added colors using Copic Markers with a variety of colors, and finished with white ink and more black. Thank you, Melike Acar, for giving us the permission to share your artwork! :) Melike's facebook.

(click images to enlarge)